Managing Users and Permissions in Linux
It is not the hunger to know but the passion to write that drives me to learn.
In every operating system, there are users and groups with unique names and unique IDs. These users have access, control, and permissions to create and manipulate files and manage processes and services.
In Linux, there are four types of users: use the $ cat /etc/groups to view all the users and user groups or $ sudo cat /etc/passwd to view the users and users groups in detail including the paths(directory) where their files are stored.

Root user
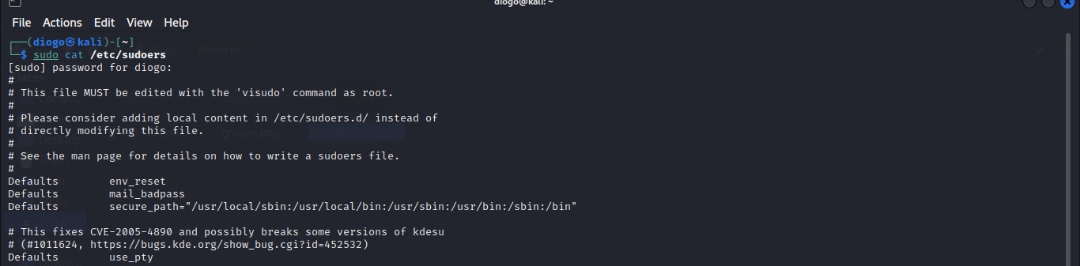
The root user is a default user automatically created upon the OS installation. The root user has the highest privileges, access to all files and services and can perform a wide range of functions. The default ID for every root user is 0. One of the ways to perform functions with administrative privileges is to initiate a command using $ sudo which means superuser do. You can equally enter into root with $ sudo -i. However, you need to provide the root password for authentication. Run $ sudo cat /etc/sudoers to view users who can use sudo or $ sudo vi /etc/sudoers to edit the file.
Regular users
During installation, a user is mandated to be created. The initial user can then create as many users as willing. The first local user has a default ID of 1000. Other users can take from 1001 to, 1002 going the numbers the more users are created.
System users
System users are daemons, non-interactive processes that run in the background. the IDs of system users range from 1 to 999.
- Groups
A group is a collection of users set to the same privileges. The group ID is the same as the ID of any regular user.
User Management Regular users are often the bone of contention in user management and security, ensuring that the files owned by a user cannot be viewed, modified or edited by other users without permission. All users have their files stored in the /home/ directory.

When we create users, we assign them a username to help us remember and identify users quickly but the system identifies users by their user IDs and groups by their group IDs.
- Adding a new user
Both $ adduser and $ useradd commands can be used. Additional useful capabilities of the adduser command include creating a home directory and others. Depending on the roles you are assigning to a user, it's possible that you can adjust the configuration files based on those roles.
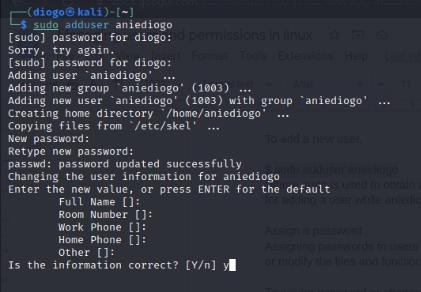
To add a new user, this process will prompt you to authenticate to get the administrative privilege to add a new user and add a password to the new user. Automatically, a user ID(UID) and a group ID(GID) are assigned to the user by the system.
$ sudo adduser aniediogo
Where sudo is used to obtain the administrative privilege to add a user, useradd is the command for adding a user while aniediogo is the username I am assigning to that user.
Assign a password to a user
Assigning passwords to users is done for security purposes. This way, a user cannot access or modify the files and functions of other users without their consent.
To assign a password or change the password of an existing user,
$ sudo passwd aniediogo
Where sudo is to get the administrative privilege, the password is a command to call for password change and aniediogo is the user whose password I want to change.

Delete or remove a user
Delete users when you no longer want them in this system.
$ sudo userdel aniediogo
Confirm the deletion by running
$ id aniediogo
Where userdel is the command, aniediogo is the username, id is to get the identity number of the user.

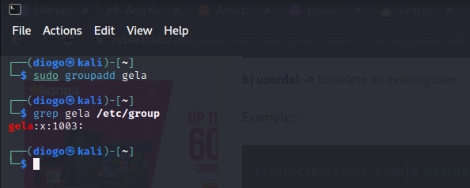
Add a new group
$ Sudo groupadd gela
Confirm the group creation by grepping the group name from the group directory /etc/groups.
$ grep gela /etc/group
Where grouped is the command used for adding a new group, Angela is the name of the group, and /etc/group is the directory where all users and groups are stored.
Delete an existing group
$ sudo groupdel gela
Confirm that the group gela” has been deleted
$ grep gela /etc/group
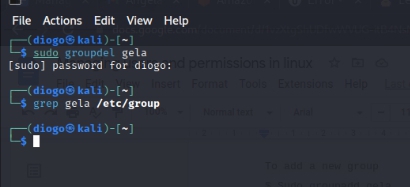
Where groupdel is the deletion command, grep is the command to filter the search, gela is the group name, /etc/group is the directory where all groups and the IDs are saved.
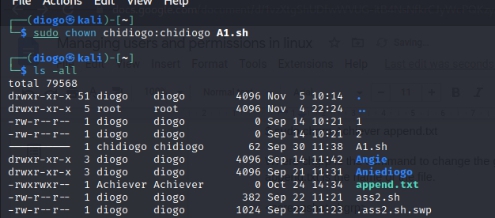
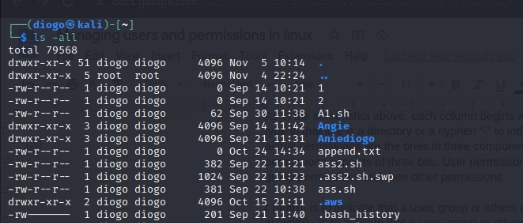
Managing Permissions Permissions are what users and groups are allowed to do with files within the OS, given that it supports multiple users, Linux employs ownership and permissions to ensure the integrity, confidentiality, and overall security of files. When you list $ ls -all, all the files within the home directories, it starts each of the lines in the list showing you the permission the root, regular user, and group have.

As in the screenshot above, each column begins with either the letter “d” to show that the file type in that line is a directory or a hyphen “-” to indicate that the file type is a regular file. The actual permissions are the ones in three components of the file mode. Each group of permissions consists of three bits. User permissions make up the first three bits, followed by group permissions and then other permissions.
r (read)- is to indicate that a user, group or others can read or list the content in a file.
w (write) - is to indicate that a user, group or others can write to the file, and make changes in the content.
x (execute) - to indicate that a user, group or others can execute or run the file which in most cases, the file contains a script.
- (empty) - to indicate that there is no permission for such a function - read, write, or execute.

Granting permissions
$ chmod command which means -** change mode**, used to change, grant and remove a read, write or execute permission to a user or group or others. For instance,
In append.txt, the user can only read, and write but cannot execute. the group can only read but can neither write nor execute. others also can only read but can neither write nor execute. To assign execute permissions to users,
$ chmod u+x append.txt
Where chmod is to change the permission, u is the user, + is to add permission and append.txt is the file.
From this same instance, if we want to grant write and execute permissions to a group or others.
$ chmod g+wx append.txt [you can independently do the same for others]
Another instance: if you wish to set read and write permissions for group and others or the file A1.sh in one command. (check the screenshot above).
$ chmod go+wx A1.sh
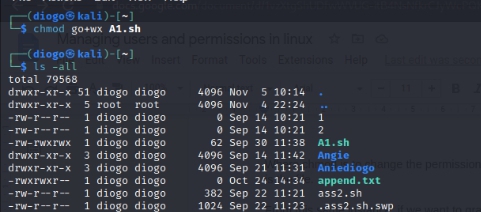
The screenshot below shows the write and execute permissions that have been granted to the group and other. Also, the permission to execute has been granted to append.txt.
Removing permissions
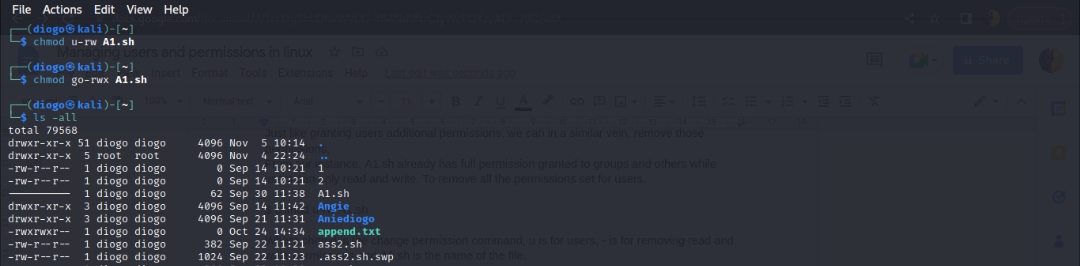
Just like granting users additional permissions, we can in a similar vein, remove those permissions. From our instance, A1.sh already has full permission granted to groups and others while users can only read and write. To remove all the permissions set for users.
$ chmod u-rw A1.sh
Where chmod is the change permission command, u is for users, - is for removing read and write permissions and A1.sh is the name of the file.
In one command, we can remove all the permissions set for the group and others.
$ chmod go-rwx A1.sh
Where chmod is the command, g, is for groups, o od for others, + is for adding permissions, r is for reading permission, w is for writing permission, and x is for executing.
Change ownership
You can change the group and user ownership of files just as we can change the permission they have with a file. For instance,

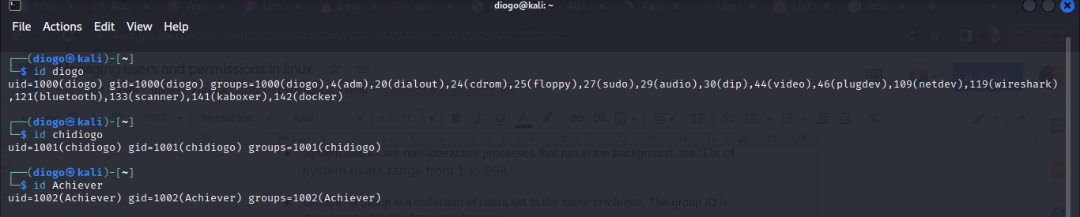
We have three users and user groups
Diogo with the user/group and the user id of 1000 chidiogo with the user/group and user id of 1001 Achiever with the user/group and user group of 1002

From $ ls -al, append.txt belongs to Diogo
If we want, we can change the ownership of that file from Diogo to either Chidiogo or Achiever,
$ sudo chown Achiever append.txt
Where sudo is to obtain root permission, chown is the command to change ownership, Achiever is the new user and append.txt is the name of the file.
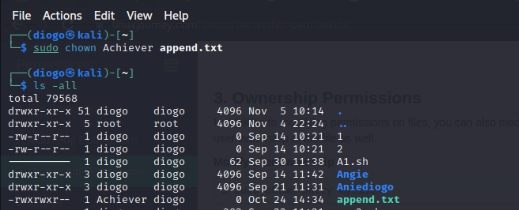
From the screenshot, the ownership of that file has changed from diogo to Achiever but the group has not changed. The file is still within the group “Diogo”.
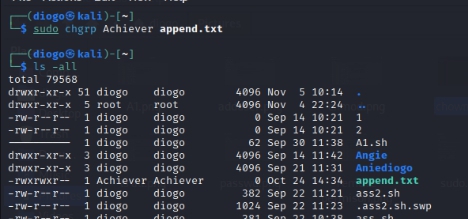
To change the group where a file belongs, we use the $ chgrp command.
$ sudo chgrp Achiever append.txt
Where chgrp is the command to change the group, Achiever is the name of the group and append.txt is the name of the file.
- To change both user ownership and group in one command,
$ sudo chown chidiogo:chidiogo A1.sh
Where chown is the change ownership command, chidiogo is the name of the user, is to indicate you want to parse another ownership, chidiogo is the group and A1.sh is the name of the file.